Issue: My Sony HT-XT2 cannot be updated via internet, due to a communication error with the server – how can I MITM the connection to analyse the issue?
Recently I bought a soundbar like gadget from Sony, the HT-XT2. After setting it up I tried to update the firmware via internet – the HT-XT2 can be connected by Ethernet as well as WLAN. When connecting to the either network type, the device displays the successful connection to the network, as well as to the internet. Although the connection is established and online features seem to work with no problem, an update of the systems firmware always fails with this given reason:
Connection status cannot be confirmed.
Cannot communicate with server.
Please try again later.
Since all other online features seem to work flawlessly, I suspected a non-working update server by Sony to be the culprit. Thus I began to MITM (man-in-the-middle) the network connection of the HT-XT2.
Step 1 – Setting up the MITM attack
There are a few options to conduct a man-in-the-middle attack, I chose to arp-spoof my target over a WLAN connection. We’re going to use Linux and arpspoof for this.
Install arpspoof:
sudo apt-get install arpspoof
Find the name of your wireless interface to use:
iwconfig
This will print a few lines. Search for the name of the interface you’re using with your WLAN connection. This can be identified by searching for the ESSID which contains the name of your WLAN. For me the interface is wlp6s0. With this information we are ready to arp-spoof our target. Arpspoof needs three parameters for this to work:
- -i: the interface to listen on
- -t: the target to poison
- -r: poison both hosts (only valid in conjuntion with -t)
Without the -r parameter, you would have to run two arp spoof attacks – one for the target, and one for the gateway. The man page of arpspoof can be found here.
In my example 192.168.0.164 is the Sony HT-XT2 and 192.168.0.1 is my modem. If there’s another device which acts a an wireless access point to the target, do not enter this devices ip. The parameter has to be the gateway of your network.
Open a terminal and enter this line, modified for your local network:
sudo arpspoof -i wlp6s0 -t 192.168.0.164 -r 192.168.0.1
This command tells our target to reply to us instead of the gateway and tells the gateway to reply to us instead of the target. This inserts our device into the middle of the HT-XT2 and our gateway (the router), achieving a man-in-the-middle attack. At this point the targets are successfully poisoned and send their requests and replies to the attacking device. However the MITM device drops every message. To forward the messages to the corresponding devices, enable ip forwarding:
su
echo "1" > /proc/sys/net/ipv4/ip_forward
exit
All traffic regarding the target is now routed through the attacking device.
Step 2 – Gathering / analysing information
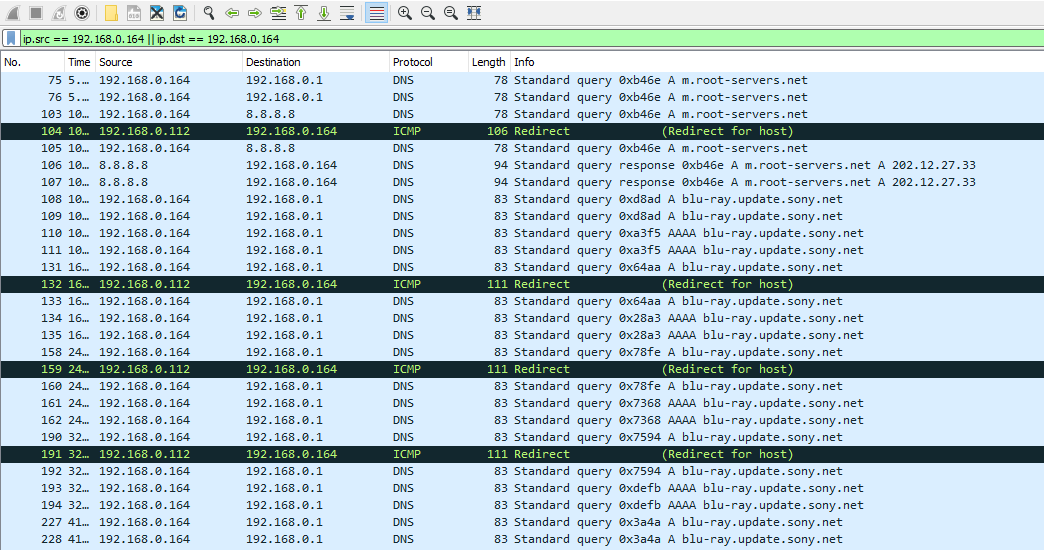
To display and analyse the sniffed traffic I used Wireshark. You may use any other network analysis tool. Record all traffic on the same wireless interface used in arpspoof. After the recording is started, try to update the HT-XT2 via internet. When the error message is displayed stop the recording in Wireshark. I suggest to set a filter to only display traffic regarding the target device in Wireshark:
ip.src == 192.168.0.164 || ip.dst == 192.168.0.164
Several DNS queries were made to m.root-servers.net and to blu-ray.update.sony.net. The result was somehow to be expected.
In my example I configured the DHCP server to serve 192.168.0.1 as a primary DNS and 8.8.8.8 as a secondary DNS to each client. 192.168.0.1 is resolved to the DNS server of my ISP. It’s very easy to spot, that the query for m.root.servers.net is not responded to by this DNS, but by Googles DNS (my secondary DNS). However there is no query for 8.8.8.8 when asking for blu-ray.update.sony.net. I assume the update server is the latter and thus no connection can be made. I suppose there’s a bug in the firmware of the HT-XT2. The solution is pretty simple now. Choose to setup the network connection manually in the HT-XT2 settings. Enter IP address, subnet etc. When prompted for the DNS server, just use 8.8.8.8 as the primary DNS.
The update server will now be found and you may update your firmware via internet.
In the end, stop the arp-spoofing attack in each terminal with Ctrl+C and disable ip forwarding:
su
echo "0" > /proc/sys/net/ipv4/ip_forward
exit

