For quite some time now I’m interested in making my home smart. I’ve started with Homematic (not the IP devices though) but as this was too expensive and not flexible enough for me I didn’t follow through. At the same time I dreamt about a tablet-like display on the wall which displays some metrics – because I love metrics, statistics and graphs – the more information, the better. Although I’m thinking about something like this for years now, this year I finally realized my dream. The dashboard centers around 2 central components – the Inkplate as an e-ink display and Home Assistant as my software, which creates the dashboard to be shown on the Inkplate.
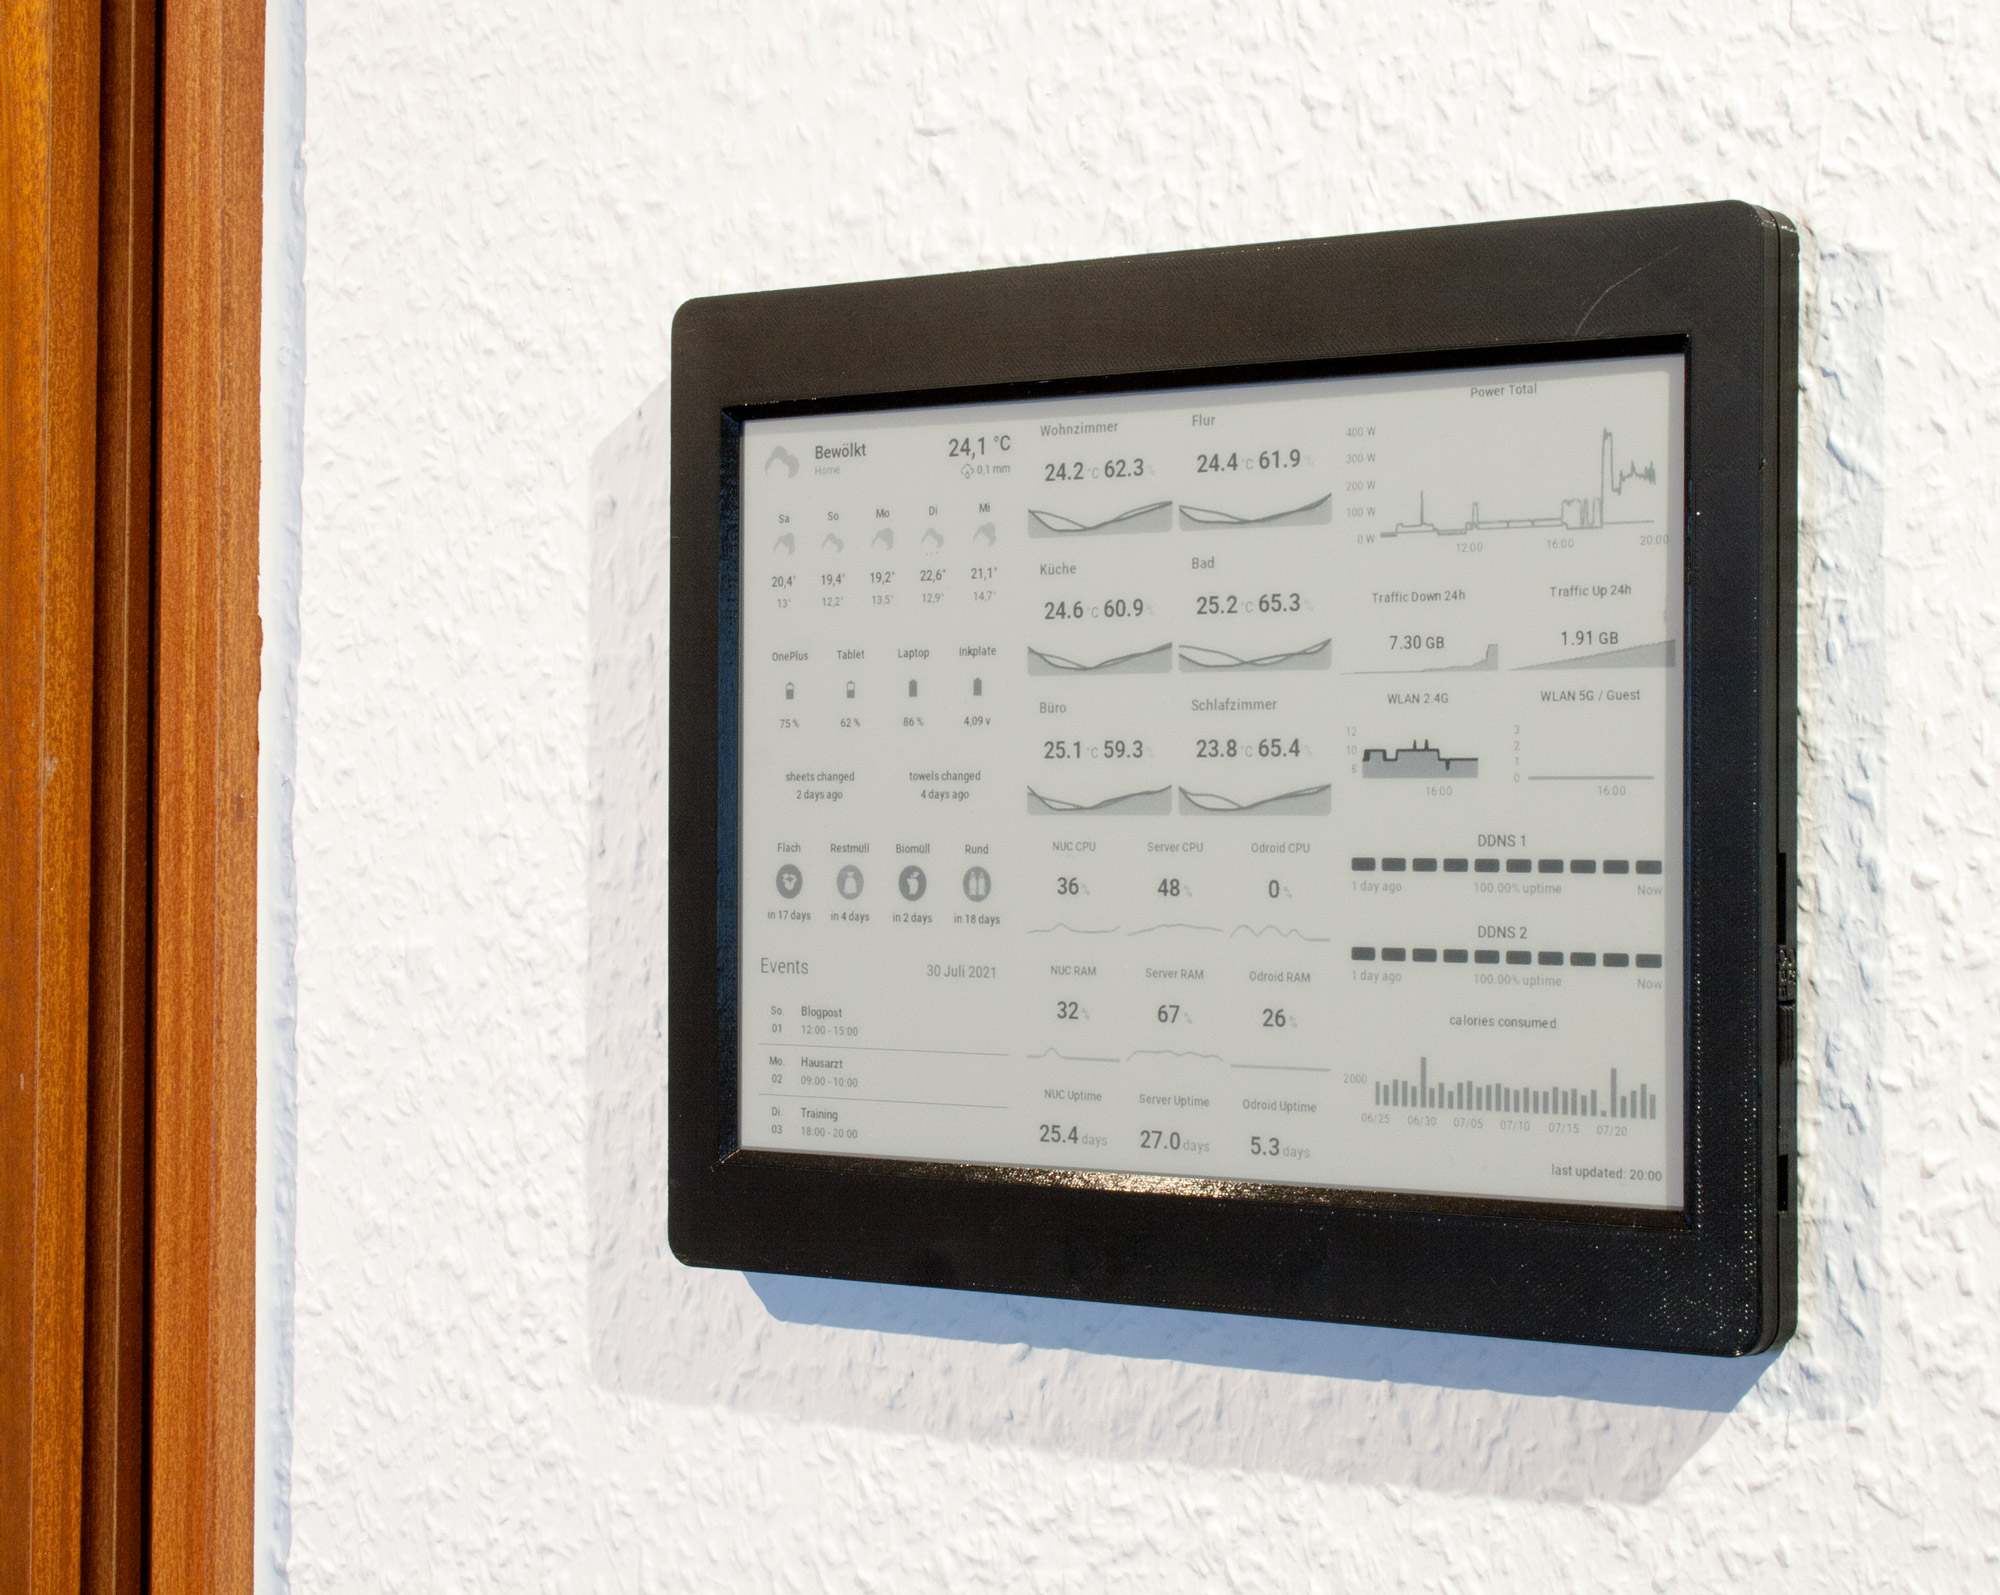
The Inkplate is simply showing a pre-rendered image from a Home Assistant lovelace view. I display a few different things: weather, calendar events, battery stats of my devices, the temperature and humidity in every room, a few metrics of servers and some information of my LAN / internet.
Because I’ve always struggled to find a comprehensive guide to create something like this, I’m doing one of my own, in which I will explain what my experiences are, where I faced issues and what I actually did to make it work. I will also show my entire code, may you choose to recreate this dashboard. As a disclaimer: I’m not using the official Raspberry Pi way to install Home Assistant, but selfhost the Docker container using Kubernetes – many concepts in this guide can be transferred though.
This guide is structured in a few subpages to keep things organized. If you’re just interested in reading about how to display something on the Inkplate, connect a battery and how to get going, read #2 to #4. On pages #5 and #6 I will give an overview on my Home Assistant installation, how my dashboard itself is structured and all the components I’m using. #7 will explain my setup using Kubernetes, which may or may not be helpful if you’re running your services in a different way. If you’re just interested in which components are in my dashboard read #6. However I recommend reading everything in chronological order to get the best understanding of how everything works together.
- Introduction
- Hardware (Inkplate & Intel NUC)
- Concepts and Architecture
- Inkplate Software
- Home Assistant – General Setup
- Home Assistant – Dashboard
- Backend / K3s
If you have some questions, feel free to drop a comment on any of those subpages, use the contact form, or message me directly on Github or Reddit (@it-obey).
Interesting
Thank you for sharing this excellent write up of creating an e-ink smart home kiosk. I particularly enjoyed the architecture diagram.
Hi very cool project. Thx a lot.
I am trying to implement it as you have described, but it is not working for me. Is there any chance that you could help me? The Quick test works and I see the 600×400 px on the inkplate. The kindle screesaver add on is installed in HA but it does not work. I get a an error:
Failed to render ProtocolError: Protocol error (Page.navigate): Cannot navigate to invalid URL
at /app/node_modules/puppeteer/lib/cjs/puppeteer/common/Connection.js:226:24
at new Promise ()
at CDPSession.send (/app/node_modules/puppeteer/lib/cjs/puppeteer/common/Connection.js:222:16)
at navigate (/app/node_modules/puppeteer/lib/cjs/puppeteer/common/FrameManager.js:148:47)
at FrameManager.navigateFrame (/app/node_modules/puppeteer/lib/cjs/puppeteer/common/FrameManager.js:131:13)
at Frame.goto (/app/node_modules/puppeteer/lib/cjs/puppeteer/common/FrameManager.js:500:41)
at Page.goto (/app/node_modules/puppeteer/lib/cjs/puppeteer/common/Page.js:1167:53)
at renderUrlToImageAsync (/app/index.js:257:16)
at process.processTicksAndRejections (node:internal/process/task_queues:95:5)
at async renderAndConvertAsync (/app/index.js:176:5) {
originalMessage: ‘Cannot navigate to invalid URL’
Converting rendered screenshot of http://192.168.168.30:8123dashboard-einktest/0?kiosk to grayscale…
}
/app/node_modules/gm/lib/command.js:301
err = new Error(‘Command failed: ‘ + stderr);
^
Error: Command failed: convert: unable to open image ‘output/cover.png.temp’: No such file or directory @ error/blob.c/OpenBlob/3569.
convert: no decode delegate for this image format `TEMP’ @ error/constitute.c/ReadImage/746.
convert: no images defined `output/cover.png’ @ error/convert.c/ConvertImageCommand/3354.
at ChildProcess.onExit (/app/node_modules/gm/lib/command.js:301:17)
at ChildProcess.emit (node:events:517:28)
at maybeClose (node:internal/child_process:1098:16)
at ChildProcess._handle.onexit (node:internal/child_process:303:5) {
code: 1,
signal: null
}
How to I set up the inkplate to display the rendered image from HA? Which values are nessary to change from your quick test?
Thx and best regards
Sebastian
Hi Sebastian,
I am not sure I understand the problem. You can display some images on the Inkplate, but not the dashboard, right? In any case I can spot an error in the link you’re trying to resolve. There is a missing slash after the port:
This is the URL from your comment:
http://192.168.168.30:8123dashboard-einktest/0?kiosk
And it should be like this:
http://192.168.168.30:8123/dashboard-einktest/0?kiosk
Make sure you can open this URL in your regular browser first, before trying to open it on the Inkplate.