Concepts and Architecture
As already described in the earlier part of this guide I’m using an Intel NUC for most of the hosting of my services. The setup of the services itself will be explained in part 4 and part 5. In this part I will describe the concept and the architecture of my approach to connect the Inkplate to the Home Assistant view from the NUC.
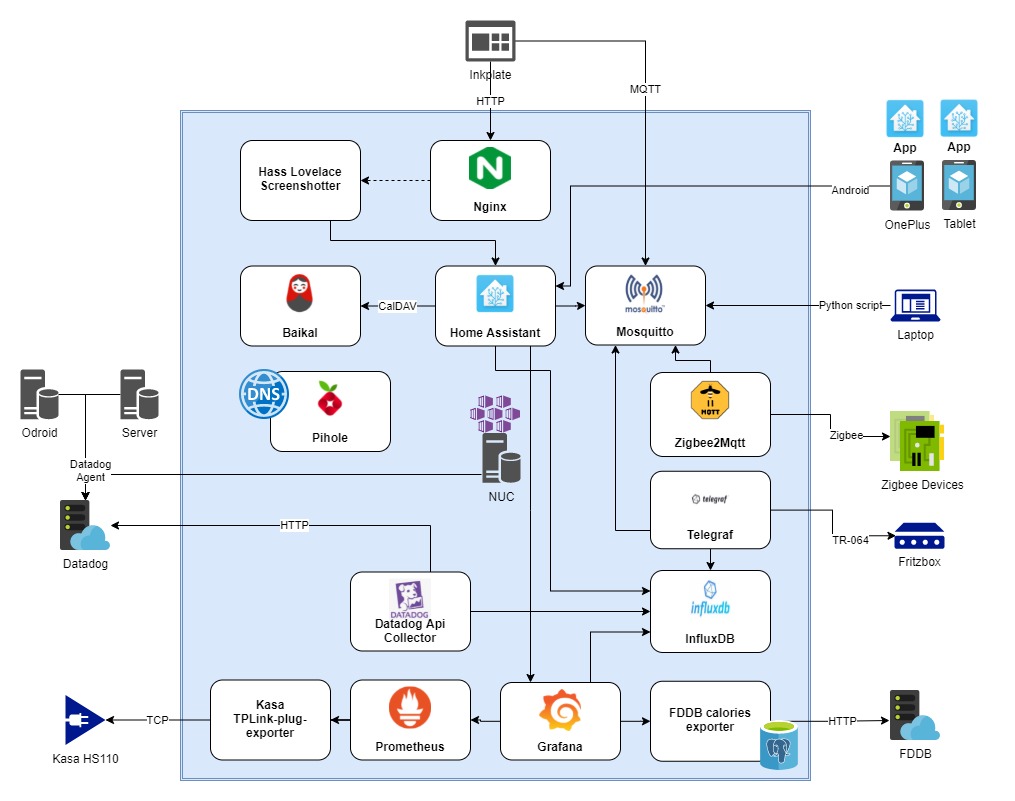
The overview of the componentens and services used to achieve this dashboard is visualized here. I will describe the communication in more detail in the following parts.
Home Assistant or website?
When I first started out with the idea to do something like this, I thought about designing a website myself which is then displayed on the Inkplate. This was even before I got into Home Assistant. Somewhere on Reddit (I guess on the Home Assistant subreddit) I saw a post by someone who designed a weather station on an e-ink display by rendering a Home Assistant view. Seeing this I began looking into Home Assistant myself. It didn’t take long for me to recognize that this will be my tool of choice to get the content of the dashboard for display. The dashboard on the Inkplate is just a website which is screenshotted and entirely interactable in Home Assistant. It just gets rendered in a fullscreen mode. I will explain this in more detail in part 4 and 5.
Inkplate Image Converter
So Home Assistant displays a nice, colorful dashboard. This is to be shown on the Inkplate. There are a few approaches to display something on the Inkplate – you can always render lines, pixels and text for yourself, which is very tedious. Another way is to display an image. There is an image converter tool which takes an image and transforms it to some kind of byte array which can be fed to the Inkplate for display. There’s also a selfhosted version on e-radionicas Github. However I soon noticed that the byte array output is far greater in size than the input image. That’s probably because the image is compressed (jpg / png compression) and about 100kb in size. The output byte array string which has to be transmitted to the Inkplate is over 2MB in size. I suppose because it contains information for every pixel for itself and does not feature any compression. Of course you may be able to compress the data yourself, but as it’s quite easy to just display images on the Inkplate, I figured this to be the way I approach it.
Image renderer
The next question in this line of thinking would be: how do I retrieve an image of the Home Assistant dashboard then? My first idea was to use puppeteer to render an screenshot of the Home Assistant website. This tool spawns a headless browser which can be interacted with and which can save screenshots of the content it displays, so it can run on the NUC. When playing around with puppeteer it just didn’t want to work for me the way I intended. Although I configured puppeteer to handle the authentication with Home Assistant, it just didn’t want to show me my lovelace view. After some research I stumbled across a fantastic tool hass-lovelace-kindle-screensaver by sibbl. This is designed to work with jailbroken Kindle devices to display a lovelace view from Home Assistant on them, but I figured it may work just fine with the Inkplate. It does. However there was some configuration necessary which I will go in to more detail about in part 7 of this guide. Moreover I needed to fork this and make some changes, which I explain in part 3. I configured it to take a screenshot every 20 minutes which works well with the deep sleep cycle I’m using on the Inkplate.
Deep Sleep and cycles
The reason why I was looking into e-ink displays is their ability to be very power efficient. Only changes on the display consume power, if the device is turned off it will keep the image because those little ink pixel thingies stay filled / depleted. This is quite an important aspect for me, as I wanted a dashboard which is not tethered to some kind of power cable and just sits on the wall by itself. Why? For aesthetics of course! So a battery is needed (described in part 1 of this guide). But I also need to limit the activity of the processor. The ESP32 inside the Inkplate features a deep sleep state which allows the device to consume very little power. In this state it can easily wake up by a predefined timer. My approach in this regard is to connect to WLAN, pull the image from the NUC, display the image, send a MQTT message (see next paragraph), disconnect from WLAN and go to sleep. After 20 minutes this cycle repeats. By using this approach the Inkplate only consumes (noticeable) power every 20 minutes for a few seconds. This allows the battery to last for (I guess) a few weeks – or even months. When increasing the gap between the wake up cycles it can last even longer. But 3 times an hour seemed to be a good middle ground for me.
Battery status and MQTT
You’ve probably seen the device percentages on my dashboard. These represent the current battery status of my mobile devices, so I have an overview what I will have to charge. How I get the data for the devices is described in part 6 of this guide, but I will explain the Inkplate here, as it’s important for the design.
There’s no possibility to display a percentage on the battery, just the voltage can be retrieved. I thought about calculating the percentage but with no experience in this regard this just seems to inaccurate to me. So I decided to display the voltage on the dashboard. As I already have a MQTT broker running (mosquitto, explained in parts 4 and 5) and a working integration to display data, I just send a MQTT message to my broker before going back to sleep. With this approach the currently displayed dashboard is 20 minutes behind regarding the voltage of the Inkplate, but this value changes so slowly that I easily can put up with this. Every other approach would be consuming more power.
tl;dr
So in summary: the hass-lovelace-kindle-screensaver tool will save a screenshot every 20 minutes to a specific folder and an Nginx server publishes this folder (why is explained in part 4). The Inkplate wakes up every 20 minutes to retrieve the image from Nginx and displays this image. It then sends an MQTT message back to the NUC with the current battery voltage and goes back to sleep.
I will go into more detail on the Inkplate side and show my code in the next part of this guide.
Interesting
Thank you for sharing this excellent write up of creating an e-ink smart home kiosk. I particularly enjoyed the architecture diagram.
Hi very cool project. Thx a lot.
I am trying to implement it as you have described, but it is not working for me. Is there any chance that you could help me? The Quick test works and I see the 600×400 px on the inkplate. The kindle screesaver add on is installed in HA but it does not work. I get a an error:
Failed to render ProtocolError: Protocol error (Page.navigate): Cannot navigate to invalid URL
at /app/node_modules/puppeteer/lib/cjs/puppeteer/common/Connection.js:226:24
at new Promise ()
at CDPSession.send (/app/node_modules/puppeteer/lib/cjs/puppeteer/common/Connection.js:222:16)
at navigate (/app/node_modules/puppeteer/lib/cjs/puppeteer/common/FrameManager.js:148:47)
at FrameManager.navigateFrame (/app/node_modules/puppeteer/lib/cjs/puppeteer/common/FrameManager.js:131:13)
at Frame.goto (/app/node_modules/puppeteer/lib/cjs/puppeteer/common/FrameManager.js:500:41)
at Page.goto (/app/node_modules/puppeteer/lib/cjs/puppeteer/common/Page.js:1167:53)
at renderUrlToImageAsync (/app/index.js:257:16)
at process.processTicksAndRejections (node:internal/process/task_queues:95:5)
at async renderAndConvertAsync (/app/index.js:176:5) {
originalMessage: ‘Cannot navigate to invalid URL’
Converting rendered screenshot of http://192.168.168.30:8123dashboard-einktest/0?kiosk to grayscale…
}
/app/node_modules/gm/lib/command.js:301
err = new Error(‘Command failed: ‘ + stderr);
^
Error: Command failed: convert: unable to open image ‘output/cover.png.temp’: No such file or directory @ error/blob.c/OpenBlob/3569.
convert: no decode delegate for this image format `TEMP’ @ error/constitute.c/ReadImage/746.
convert: no images defined `output/cover.png’ @ error/convert.c/ConvertImageCommand/3354.
at ChildProcess.onExit (/app/node_modules/gm/lib/command.js:301:17)
at ChildProcess.emit (node:events:517:28)
at maybeClose (node:internal/child_process:1098:16)
at ChildProcess._handle.onexit (node:internal/child_process:303:5) {
code: 1,
signal: null
}
How to I set up the inkplate to display the rendered image from HA? Which values are nessary to change from your quick test?
Thx and best regards
Sebastian
Hi Sebastian,
I am not sure I understand the problem. You can display some images on the Inkplate, but not the dashboard, right? In any case I can spot an error in the link you’re trying to resolve. There is a missing slash after the port:
This is the URL from your comment:
http://192.168.168.30:8123dashboard-einktest/0?kiosk
And it should be like this:
http://192.168.168.30:8123/dashboard-einktest/0?kiosk
Make sure you can open this URL in your regular browser first, before trying to open it on the Inkplate.