
Dynamically Filling Requests In SoapUI Using A Textfile
Published Updated 10 years ago
Issue: How can I dynamically fill variables from a textfile into a soap request and run those automatically using SoapUI?
While working a client project I got the request to call a webservice method a couple of hundred times. Each iteration needed a specific id to be sent to the server. For an easy solution I wanted to utilize SoapUI by SmartBear. (Un-) Suprisingly only the paid Pro version is able to bind datasources. However it’s possible to read from a textfile on the local filesystem with a rather small Groovy script – even in the free version of SoapUI.
Prerequisites
The goal of this approach is to have a textfile on the local filesystem, containing one value per line. Each line will be read, enveloped in the soap request and sent to the server. I assume you already have SoapUI installed and created a project for your webservice.
Step 1 – Creating a Test Suite in SoapUI
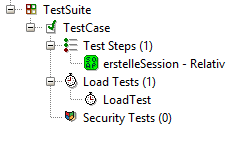
test suite setup
To start we’ll have to create a test suite, including a test case as well as a load test. Your test suite project setup should look somewhat like the image on the right.
I advise you to use the displayed naming of the test suite elements – I have neither tried the script with different named elements, nor do I know if the script actually references those elements by name or by id – if you happen to give it a try, please feel free to let me know in the comments.
Now open up the load test and change the value of the top drop down box to Total Runs and Limit to the count of lines in your textfile. You might want to adjust the values for Threads, Strategy, Test Delay and Random to get a more linear way of sending out your batch requests.

load test configuration
To iterate over the textfile, we need a counter. This variable can be set inside the properties of a test case or a test suite. Because the test case is a locked down entity itself, we set the needed property inside the test suite. Our test case is then able to access this property through the hierarchy.

setting properties inside the test suite
As pictured above, set a property named line (or anything else, just remember to configure the Groovy script later). Groovy starts counting at 0, so enter this value – this represents the first line in our textfile.
The counter variable inside of the test suite won’t reset after executing a load test. After every usage of your load test, you will have to reset the variable manually inside of the test suite properties. You may also script this behaviour inside of the load test or test suite.
Next, open up the test case and set a property for the value of the textfile lines. Each iteration will fill this property, sent out the request and refill it using the next line – hence we won’t be setting a property beforehand:

setting properties inside the test case
Step 2 – Creating a Groovy script
Now as the infrastructure for the test suite is almost ready, some real work is done. Click Setup Script inside your test case and paste this Groovy script inside, which reads every line of the textfile and applies it to the soap request.
def myTestCase = context.testCase

// configure the path to your textfile here
File tempFile = new File("c:/Daten/inputfile.txt")
List lines = tempFile.readLines()

// configure the variable name of your counter here
int myLineInt = testRunner.testCase.testSuite.getPropertyValue("line").toInteger()

// configure your variable names here
myTestCase.setPropertyValue("clientID", lines[myLineInt])
inputValue = context.expand( '${#TestCase#clientID}' )

myLineInt++
String myLineString = myLineInt.toString()

// configure the variable name of your counter here
testRunner.testCase.testSuite.setPropertyValue("line", myLineString)

log.info ("Line" + myLineInt + " sent with value: " + inputValue)
Remember to match your path to the textfile, as well as the variable names clientID and line (if you renamed those earlier). Now there’s one thing left to do: open up your soap request, but make sure you open up the one inside your test suite – not the general one outside of your test suite. Use this code as a value:
${#TestCase#clientID}The specific part of your request should look like this by now:

setting the value inside the request
We’re done now. Fire up your load test to send out requests using the values of the textfile.
Logging load tests in SoapUI is deactivated per default. You might enable logging Groovy script console printing in Preferences > UI Settings > Do not disable Groovy Logs. Error level statements will be logged regardless of this option. Remember that this option just applies to your own log statements – SoapUI will not log every request and response (there’s probably an option for this though).
Comments
Comments are hosted on comments.itobey.dev. Loading them sets cookies and shares your IP address with that service.